 View on GitHub
 Install in Dash
 Getting Started Guide Reference
Getting Started with ReSwift
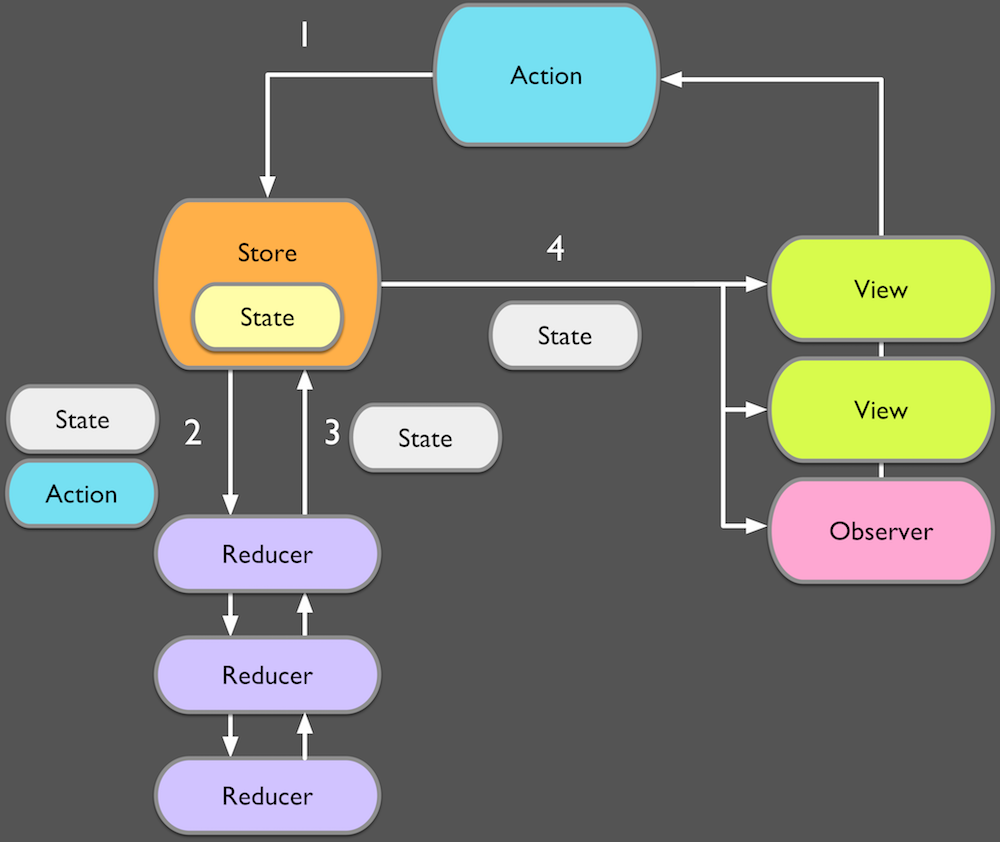
ReSwift provides the infrastructure for Stores, Actions and Reducers to enable a unidirectional data flow as shown below.
The following section will briefly describe how to set up the core components of ReSwift in your app. The next section will describe the components that power ReSwift in depth.
To see ReSwift in action, have a look at the repositories on GitHub, which contains example apps and playgrounds.
General Setup and High-Level Overview
This section will show you how to set up the core ReSwift components in your app. It is intended to provide a quick start to get the ball rolling.
High-Level Overview
To get the infrastructure up and running you need to set up a Store for a root app state type. The type requirement is ReSwift.Store<State>. You set it up like this:
import ReSwift

struct AppState {
    // ... app state properties here ...
}

func appReducer(action: Action, state: AppState?) -> AppState {
    // ...
}

let store = Store(
    reducer: appReducer,
    state: AppState(),   // You may also start with `nil`
    middleware: [])      // Middlewares are optional
Keep the store around somewhere. For example in an NSDocumentController, the AppDelegate, or as a global variable.
The process of implementing then works like this:
- You can add subscribers to the store and dispatch actions.
- The actions will be pre-processed by your middleware. The middleware can act on actions and pass them along, producing side effects or dispatching additional actions itself. It can also do some side effects like logging to the console and passing the action along.
- Finally, if any action was passed through all middleware, it’ll reach the root reducer, here called
appReducerby convention. The reducer changes the state according to the incoming action. - The resulting state is then stored in the store. The store consequently propagates the new state to all subscriptions, reaching the subscriber objects if the subscription requirements are met. For example, one requirement may be to notify subscribers only when the state they are interested in has changed. This is the default
Storesetting. If you want to pass on identical states after a reducer pass, have a look atautomaticallySkipsRepeatsin theStore‘s initializer.
For reference, the store’s initializer and the initializer’s type requirements all together look like this:
class Store<State>: StoreType {
    public required init(
        reducer: @escaping Reducer<State>,
        state: State?,
        middleware: [Middleware<State>] = []
    ) { ... }
}
Reducer<State> is a mere function signature alias:
typealias Reducer<ReducerStateType> =
    (action: Action, state: ReducerStateType?) -> ReducerStateType
To find out more about how to implement the concrete types and satisfy their requirements, read on. To get a look at the source of these few core types that make up ReSwift, check out the code on GitHub.
Minimal Working Example
If you want to see how you can fill in the gaps we left above, take a look at the following example:
import ReSwift

struct AppState {
    var count = 0
}

// This action does not have state and is a mere marker of "X happened":
struct AddAction: Action { }

func appReducer(action: Action, state: AppState?) -> AppState {
    var state = state ?? AppState()

    switch action {
    case let addAction as AddAction: state.count += 1
    default: break
    }

    return state
}

let store = Store(
    reducer: appReducer,
    state: AppState(),
    middleware: [])
To make something happen, dispatch an action:
store.dispatch(AddAction())
Components
This section will show details about the various core components you’ve been shown in the previous section.
State
The application state is defined in a single data structure, which should be a struct. This struct can have other structs as members, which allows you to add different sub-states as your app grows. The state struct should store your entire application state. This includes the UI state, navigation state and the state of your model layer.
Here’s an example of a state struct as defined in the Counter Example:
struct AppState {
    var counter: Int = 0
    var navigationState = NavigationState()
}
If you are including ReSwiftRouter in your project, your app state needs to contain a property of type NavigationState. This is the sub-state the router will use to store the current route.
Derived State
Note that you don’t need to store derived state inside of your app state. The app state should store all the information that uniquely identifies the current state and allows it to be reconstructed, but none that can be easily derived. For example, instead of directly storing a UIImage you should store a URL that can be used to fetch the image from a cache or a download.
Actions
Actions are used to express intended state changes. Actions don’t contain functions. Instead, they provide information about the intended state change. For example, the user to be deleted in a DeleteUser action. In your ReSwift app you will define actions for every possible state change that can happen. Reducers handle these actions and implement state changes based on the information the actions provide. All actions in ReSwift conform to the Action protocol, which currently is just a marker protocol.
To provide your own action, simply create a type that conforms to the Action protocol:
struct SetOAuthURL: Action {
    let oAuthUrl: URL
}
Reducers
Reducers are the only place in which you should modify application state. Reducers take the current application state and an action then return the new transformed application state. We recommend to provide many small reducers that each handle a subset of your application state.
You can do this by implementing a top-level function that matches the Reducer signature. This reducer will then call individual reducer functions for each different part of the app state, according to their areas of responsibility.
Here’s an example in which we construct a new state by calling sub-reducers with different sub-states:
func appReducer(action: Action, state: State?) -> State {
    return State(
      navigationState: navigationReducer(action, state?.navigationState),
      authenticationState: authenticationReducer(action, state?.authenticationState),
      repositories: repositoriesReducer(action, state?.repositories),
      bookmarks: bookmarksReducer(action, state?.bookmarks)
   )
}
The Reducer typealias is a function that takes an Action and a State? then returns a State. Typically reducers will be responsible for initializing the application state. When they receive nil as the current state, they should return the initial default value for their portion of the state. In the example above the appReducer delegates all calls to other reducer functions.
For example, authenticationReducer is responsible for providing the authenticationState. Here’s what the authenticationReducer function might look like:
func authenticationReducer(action: Action, state: AuthenticationState?) -> AuthenticationState {
    var state = state ?? initialAuthenticationState()

    switch action {
    case _ as ReSwiftInit:
        break
    case let action as SetOAuthURL:
        state.oAuthURL = action.oAuthUrl
    case let action as UpdateLoggedInState:
        state.loggedInState = action.loggedInState
    default:
        break
    }

    return state
}
You can see that the authenticationReducer function is a free function. You can define it with any arbitrary signature but we recommend that it resembles the Reducer typealias (action and current state in, new state out).
Note: The typealias uses unnamed parameters because Swift does not allow parameter names in this case so we say we recommend it “resembles” the signature defined in the typealias while our examples use named action and state parameters for clarity.
This sub-reducer first checks if the state provided is nil. If that’s the case, it sets the state to the initial default state. Next, the reducer switches over the provided action and checks its type. Depending on the type of action, this reducer will update the state differently. This specific reducer is very simple: each action only triggers a single property of the state to update. Once the state update is complete, the reducer function returns the new state.
After the appReducer has called all of the sub-reducer functions, we have a new application state. ReSwift.Store will take care of publishing this new state to all subscribers.
Store Subscribers
Store subscribers are types that are interested in receiving state updates from a store. Whenever the store updates its state it will notify all subscribers by calling the newState function on each. Subscribers need to conform to the StoreSubscriber protocol:
protocol StoreSubscriber {
    func newState(state: StoreSubscriberStateType)
}
Most of your StoreSubscribers will be view controllers (UIViewController and NSViewController) and update their views’ representations of that state whenever they receive a new one via newState().
Example With Filtered Subscriptions
Ideally most of our subscribers should only be interested in a very small portion of the overall app state. ReSwift provides a way to subselect the relevant state for a particular subscriber at the point of subscription.
Here’s an example of a UIViewController subscribing, filtering, and unsubscribing to state changes:
override func viewWillAppear(animated: Bool) {
    super.viewWillAppear(animated)

    // subscribe when VC appears
    // we are only interested in repository sub-state, filter it out of the overall state
    store.subscribe(self) { subscription in
        subscription.select { state in state.repositories }
    }
}

override func viewWillDisappear(animated: Bool) {
    super.viewWillDisappear(animated)
    // unsubscribe when VC disappears
    store.unsubscribe(self)
}

// The `state` argument needs to match the selected sub-state
func newState(state: Response<[Repository]>?) {
    if case let .Success(repositories) = state {
        dataSource?.array = repositories
        tableView.reloadData()
    }
}
In the example above we only select a single property from the overall application state: a network Response with a list of repositories.
When selecting a sub-state as part of calling the subscribe function, you need to make sure that the argument of the newState function has the same type as that which is returned by the state subselection in the subscribe function.
When subscribing within a simpler view controller you will typically update the view from within the newState function. You can of course parcel out responsibility for more complex view updating logic to other functions that newState will call. For example, the logic of creating the derived state such as an attributed string should live in its own function whose arguments include the necessary information given by newState.
Example of Skipping Identical State Updates
By default, when you create a Store it will be set up to use the skipRepeats subscription transformation for the selected sub-state if it conforms to Equatable. You can disable this by setting automaticallySkipsRepeats to false in the identifier. With this change, every dispatched action will trigger an update to all subscribers even if their sub-state has not changed its value.
You can selectively enable skipping duplicate values with skip(when:):
override func viewWillAppear(animated: Bool) {
    super.viewWillAppear(animated)

    store.subscribe(self) { subcription in
        subcription.skip(when: ==)
    }
}
If your state does not conform to Equatable, simply passing == as the predicate won’t work unless you write the equality function. You can also pass a closure to do the work, giving you more control over what should be considered a change for each of your subscribers. A more complex example:
store.subscribe(self) { subcription in
    subcription
        // We're only interested in repositories ...
        .select  { state in state.repositories }
        // ... but want to always refresh the view when the state has content,
        // for example because checking contents for equality would be
        // too expensive. In other words, skip if empty.
        .skip(when: { repositories in repositories.isEmpty })
}
Beyond the Basics
Asynchronous Operations
Conceptually asynchronous operations can simply be treated as state updates that occur at a later point in time. Here’s a simple example of how to tie an asynchronous network request to a ReSwift state update:
func fetchGitHubRepositories(state: State, store: Store<State>) -> Action? {
    guard case let .LoggedIn(configuration) = state.authenticationState.loggedInState  else { return nil }

    Octokit(configuration).repositories { response in
        DispatchQueue.main.async {
            store.dispatch(SetRepostories(repositories: response))
        }
    }

    return nil
}
In this example we’re using the Octokit library to perform a network request that fetches a user’s repositories. Within the callback block of the function we dispatch a state update that injects the received repositories into the app state. This will trigger all subscribers to be informed about the new state.
Note that the callback block from the network request arrives on a background thread, therefore we’re using DispatchQueue.main.async to perform the state update on the main thread. ReSwift will call reducers and subscribers on whatever thread you have dispatched an action from. We recommend to always dispatch from the main thread, but ReSwift does not enforce this recommendation. ReSwift will enforce that all Dispatches, Store Subscribes and Store Unsubscribes are on the same thread or serial Grand Central Dispatch queue. Therefore the main dispatch queue works, however the global dispatch queue, being concurrent, will fail.
In many cases your asynchronous tasks will consist of two separate steps:
- Update UI to show a loading indicator
- Refresh the UI once data arrived (or an error occurred)
You can extend the example above by dispatching a separate action as soon as the network request starts. The goal of that action is to trigger the UI to show a loading indicator as a side-effect of the fetch request.
func fetchGitHubRepositories(state: State, store: Store<State>) -> Action? {
    guard case let .LoggedIn(configuration) = state.authenticationState.loggedInState  else { return nil }

    Octokit(configuration).repositories { response in
        DispatchQueue.main.async {
            store.dispatch(SetRepostories(repositories: .repositories(response)))
        }
    }

    return SetRepositories(repositories: .loading)
}
In the example above we’re using an enum to represent the different states of a single state slice that depends on a network request. It may look something like this:
enum GitHubFetchRequestState {
    case loading
    case repositories(Response<[Repository]>) // the OctoKit response provided to the `repositories` closure
    case networkError(Error)
}
There are many different ways to model states of a network request but it will mostly involve using multiple dispatched actions at different stages of your network requests.
Action Creators
An important aspect of adopting ReSwift is an improved separation of concerns. Specifically, your view controllers should mostly be concerned with adapting its representation to reflect a new app state and for triggering Actions upon user interactions.
The triggering of actions should always be as simple as possible to avoid any sort of complicated business logic in the view controller. However, in some cases it can be complicated to decide whether an action should be dispatched or not. Instead of checking the necessary state directly in the view controller, you can use ActionCreators to perform a conditional dispatch.
Just like an Action, an ActionCreator function can be dispatched to the store. An ActionCreator takes the current application state and a reference to a store then may return an Action (hence the Action? optional return type).
An ActionCreator has the following type signature:
typealias ActionCreator = (state: State, store: StoreType) -> Action?
A very simple example of an ActionCreator might be:
func doubleValueIfSmall(state: TestAppState, store: Store<TestAppState>) -> Action? {
    if state.testValue < 5 {
        return SetValueAction(state.testValue! * 2)
    } else {
        return nil
    }
}
Middleware
ReSwift supports middleware in the same way as Redux does. You can read this great documentation on Redux middleware to get started. Middleware allows developers to provide extensions that wrap the dispatch function.
Let’s take a look at a quick example that shows how ReSwift supports Redux-style middleware. This example middleware prints all actions to the console:
let loggingMiddleware: Middleware<Any> = { dispatch, getState in
    return { next in
        return { action in
            // perform middleware logic
            print(action)

            // call next middleware
            return next(action)
        }
    }
}
The generic Any in middleware refers to the return type in getState, and needs to be compatible with the State associated type in your Store.
You specify the middleware you would like to use when creating your store:
Store(reducer: reducer, appState: TestStringAppState(),
                    middleware: [loggingMiddleware, secondMiddleware])
The actions will pass through the middleware in the order in which they are arranged in the array passed to the store initializer. However, ideally middleware should not make any assumptions about when exactly it is called.