 View on GitHub
 Install in Dash
 Getting Started Guide Reference
Getting Started with ReactiveReSwift
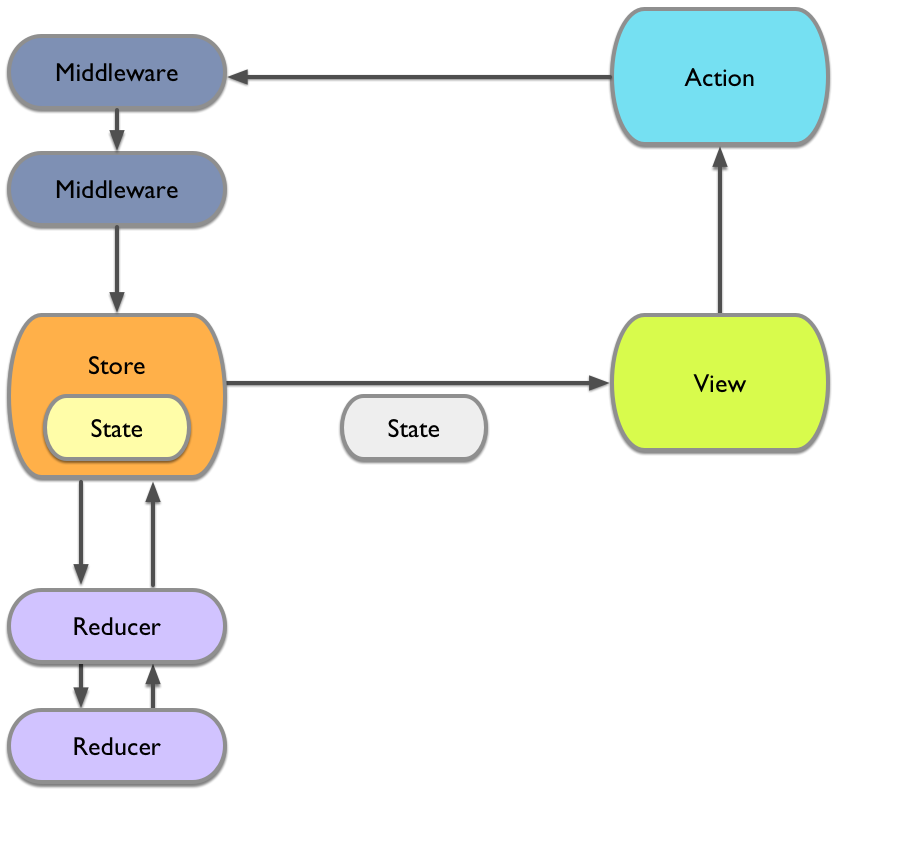
ReactiveReSwift provides the infrastructure for Stores, Actions and Reducers to enable a unidirectional data flow as shown below.
The following steps will describe how to set up the individual components for your ReactiveReSwift app.
State
The application state is defined in a single data structure which should be a struct. This struct can have other structs as members, that allows you to add different sub-states as your app grows.
The state struct should store your entire application state, that includes the UI state, the navigation state and the state of your model layer.
Here’s an example of a state struct as defined in the Reactive Counter Example:
struct AppState: StateType {
    var counter: Int = 0
}
Your app state struct needs to conform to the StateType protocol, this is just a marker protocol.
Derived State
Note that you don’t need to store derived state inside of your app state. E.g. instead of storing a UIImage you should store a image URL that can be used to fetch the image from a cache or via a download. The app state should store all the information that uniquely identifies the current state and allows it to be reconstructed, but none that can be easily derived.
Actions
Actions are used to express intended state changes. Actions don’t contain functions, instead they provide information about the intended state change, e.g. which user should be deleted.
In your ReactiveReSwift app you will define actions for every possible state change that can happen.
Reducers handle these actions and implement state changes based on the information the actions provide.
All actions in ReactiveReSwift conform to the Action protocol.
You will need to provide custom types for actions. We recommend using an enum for actions that have similar goals (e.g. increasing and decreasing a value). If an action is completely independent from the rest of your actions, using a struct might work better.
To provide your own action, simply create a type that conforms to the Action protocol:
enum ModifyCountAction: Action {
    case increase
    case decrease
}

struct LikePostAction: Action {
    let post: Post
    let userLikingPost: User
}
Reducers
Reducers are the only place in which you should modify application state! Reducers take the current application state and an action and return the new transformed application state. We recommend to provide many small reducers that each handle a subset of your application state.
You can do this implementing a top-level reducer. This reducer will then call individual functions for each different part of the app state.
Here’s an example in which we construct a new state, by calling sub-reducers with different sub-states:
let appReducer = Reducer(authenticationReducer, bookmarksReducer, repositoriesReducer)

let authenticationReducer = Reducer<State> { action, state in
    var state = state

    switch action {
    case let action as SetOAuthURL:
        state.authenticationState.oAuthURL = action.oAuthUrl
    case let action as UpdateLoggedInState:
        state.authenticationState.loggedInState = action.loggedInState
    default:
        break
    }

    return state
}

let bookmarksReducer = Reducer<State> { action, state in
    var state = state

    if let action = action as? CreateBookmark {
        let bookmark = (route: action.route, routeSpecificData: action.routeSpecificData)
        state.bookmarks.append(bookmark)
    }

    return state
}

let repositoriesReducer = Reducer<State> { action, state in
    var state = state

    if let action = action as? SetRepostories {
        state.repositories = action.repositories
    }

    return state
}
The Reducer struct has an init that takes a function that expects an Action and an State and returns a State. In the example above the appReducer deals with reducing . E.g. the authenticationReducer is responsible for providing the authenticationState.
You can see that the authenticationReducer function is a free function. You can define it with any arbitrary method signature, but we recommend that it matches the method in the Reducer protocol (current state and action in, new state out).
The sub reducers switch over the provided action and checks its type. Depending on the type of action, this reducer will updated the state differently. These specific reducers are very simple, each action only triggers a single property of the state to update.
Once the state update is complete, the reducer function returns the new state.
After appReducer has called all of its sub reducers, we have a new application state. ReactiveReSwift will take care of publishing this new state to all subscribers.
Store Subscriptions
The following instructions only apply if you don’t use a third party FRP library with ReactiveReSwift, which we highly recommend you do
To subscribe to the store a method needs to call subscibe(_:) on Store.observable and keep a reference to its SubsciptionReference (unless it’s a class guaranteed to always exist) .
let disposable = mainStore.observable.subscribe { [weak self] store in
    self?.counterLabel.text = String(store.counter)
}
Most of your StoreSubscribers will be in the view layer and update their representation whenever they receive a new state.
Example With Filtered Subscriptions
Ideally most of our subscribers should only be interested in a very small portion of the overall app state. ReactiveReSwift provides a way to subselect the relevant state for a particular subscriber at the point of subscription. Here’s an example of subscribing, filtering and unsubscribing as used within a view controller:
let disposeBag = SubscriptionReferenceBag()

override func viewDidLoad(animated: Bool) {
    super.viewDidLoad(animated)

    // subscribe when VC loads
    disposeBag += store.observable.subscribe { [weak self] store in
        if case .Success(let repositories) = state.repositories {
            self?.dataSource?.array = repositories
            self?.tableView.reloadData()
        }
    }
}
In the example above we only select a single property from the overall application state: a network Response with a list of repositories.
When subscribing within a ViewController you will typically update the view from within the subscribe block.
Beyond the Basics
Asynchronous Operations
Conceptually asynchronous operations can simply be treated as state updates that occur at a later point in time. Here’s a simple example of how to tie an asynchronous network request to ReactiveReSwift state update:
func fetchGitHubRepositories(state: State, store: Store<State>) {
    guard case .LoggedIn(let configuration) = state.authenticationState.loggedInState else { return }

    let promise = PromiseKit.wrap { resolve in
        Octokit(configuration).repositories(resolve)
    }.then {
        SetRepostories(repositories: $0)
    }

    store.dispatch(promise)
}
In this example we’re using the Octokit and PromiseKit libraries to perform a network request that fetches a user’s repositories. We then convert that request to a Promise that’s conformed to StreamType and dispatch that promise into the store (the store will subscribe to that promise and dispatch the returned ). This will trigger all subscribers to be informed about the new state.
In many cases your asynchronous tasks will consist of two separate steps:
- Update UI to show a loading indicator
- Refresh the UI once data arrived
You can extend the example above, by dispatching a separate action, as soon as the network request starts. The goal of that action is to trigger the UI to update & show a loading indicator.
func fetchGitHubRepositories(state: State, store: Store<State>) {
    guard case let .LoggedIn(configuration) = state.authenticationState.loggedInState else { return }

    store.dispatch(SetRepositories(repositories: .Loading))

    let promise = PromiseKit.wrap { resolve in
        Octokit(configuration).repositories(resolve)
    }.then {
        SetRepostories(repositories: $0)
    }

    store.dispatch(promise)
}
In the example above, we’re using an enum to represent the different states of a single state slice that depends on a network request (e.g. loading, result available, network request failed). There are many different ways to model states of a network request but it will mostly involve using multiple dispatched actions at different stages of your network requests.
Middleware
ReactiveReSwift supports middleware in the same way as Redux does, you can read this great documentation on Redux middleware to get started. Middleware allows developers to provide extensions that wrap the dispatch function.
Let’s take a look at a quick example that shows how ReactiveReSwift supports Redux style middleware.
The simplest example of a middleware, is one that prints all actions to the console. Here’s how you can implement it:
let loggingMiddleware = Middleware<State>().sideEffect { getState, dispatch, action in
    // perform middleware logic
    print(action)
}
You can define which middleware you would like to use when creating your store:
Store(
    reducer: appReducer,
    stateType: TestStringAppState.self,
    observable: ObservableProperty(TestStringAppState()),
    middleware: Middleware(loggingMiddleware, secondMiddleware)
)
The actions will pass through the middleware in the order in which they are arranged in the Middleware initializer, however ideally middleware should not make any assumptions about when exactly it is called.
Middleware supports multiple different operations.
In no particular order, some of the more important operations are:
sideEffect(_:)Gives access to thedispatch(_:)function. Does not return, to ensure that only side effects reside inside.filter(_:)If the predicate function passed to filter passes, keep the action, otherwise discard the action.map(_:)Apply a transformative function to the action.flatMap(_:)Essentially amapthat can also filter out the action by returningnil